Tuesday, October 18, 2016

Inserting Large Amount of Records into Database with SqlBulkCopy

Recently we came across an interesting situation analyzing performance hinge of a data importer implementation. The existing implementation of a data importer in the project i was working on, had individual sql insert queries for each data record to be inserted into a database table. Obviously it was a heavy operation to insert thousands of records into the database.

The good news is that there are some handy solutions exist to handle such situations with much more efficiency. Well, we mainly considered two approaches, to either use table valued parameters, and to use SQLBulkCopy class.  Microsoft SQL Server also includes a popular command-line utility named bcp for quickly bulk copying large files into tables or views in SQL Server databases.

The SqlBulkCopy class can be used to write data only to SQL Server tables. But the data source is not limited to SQL Server; any data source can be used, as long as the data can be loaded to a DataTable instance or read with a IDataReader instance.

We had data records on a text file, written into an specific csv like format. We were using EntityFramework-like data access layer implementation, hence the solution can be generalized to use EntityFramework as well.

We had to implement file data reader class to read the file data into an IEnumerable

private IEnumerable GetFileContents(String filePath))
{
   //read the file and other logic
   foreach (var dataLine in dataLines){
      //some other logic
      yeild return entityObject;
   }
}

Since there were no existing implementation of IDataReader which use enumerator as a data source, we had to do our own implementation. A sample code can be found at my gist https://gist.github.com/isurusndr/450cfd0b2b19cd92ca322685d648877d

Calling of SqlBulkCopy is straight forward.

public static void BulkCopy(IEnumerable items, string connectionString)
{
   var bulkCopy = new SqlBulkCopy(connectionString);
   var reader = new EnumerableDataReader(items);

   foreach (var column in reader.ColumnMappingList)
   {
       bulkCopy.ColumnMappings.Add(column.Key, column.Value);
   }
 
    bulkCopy.BatchSize = 10000;
    bulkCopy.BulkCopyTimeout = 1800;
    bulkCopy.DestinationTableName = "EntityTable";
    bulkCopy.WriteToServer(reader);
    bulkCopy.Close();
}

Keep in mind not to set lower values to BatchSize property of SqlBulkCopy. Higher the value of batch size, better the performance would be.

The performance improvement we got was fantastic. We could brought initial time of 8 minutes to insert a sample data set, to less than 30 seconds at the end.


Wednesday, August 31, 2016

Cheap Chinese Mini LED Projectors

Few months back, when I was looking for a projector for a reasonable price for presenting things in meetings, I found mini LED projectors at ebay quite interesting. There are quite a lots of models available for purchase at various price ranges.

These projectors are called simplified micro projectors (SMP). It is one kind of projector which has simplified system structure design, but with multi-function. These projectors usually uses LCD as the image system and LED as light source.

The most important thing I have to tell you is that do not keep high expectation if you decide to buy a cheap projector. It comes with less/basic features for the less price you pay.

Usually these projectors can not be used in environments with bright light. Cheap SMPs can not produce a larger picture, but you can get a decent 34 to 130 inches image in a fairly dark environment. The picture isn't too bright, so you can get the best output in a dark room. Hence think of your requirement before buying one. It would suit well for home cinema. For doing a presentation in a fairly dark room, well it will yet do a reasonable job. But beyond that, you will have to go for an expensive projector.

UC40 and RD805 projectors


After doing few weeks of reading on internet, I finally ordered Unic UC40 model. My budget was around 80 USD, and UC40 was the best option to go as per some reviews. Alternatively GM 60 (another reference) and RD 805 seemed to be a good option too. Later I ordered RD805 for one of my friends. It was bit hard task to compare between models as there were not much reviews on internet on these projectors.

Most of SMPs produce 1000 lumens brightness and 1:1000 contrast ratio. They have 800x450 pixel resolution, well those specs are adequate for the price you paying.

I will bring a comparative review of UC40 and RD805 in my next post.

Friday, August 5, 2016

Integrating Bit Bucket with Sonar

In connection with my previous post on generating a sonar violations report by email, this post is about how I integrated BitBucket with Sonar.

This integration generated comments indicating sonar violations on file changes within a pull request.  It will enable the visibility of violations being introduced from code within a GIT feature branch, at the time of pull request to merge the branch with the master. It will further make the life of peer reviewer a lot easy.

A free add-on to Bit Bucket called 'Sonar for Bitbucket Cloud' together with Bitbucket plugin for SonarQube were used for the integration. The integration would do followings.

  • Shows all relevant SonarQube statistics for a Bitbucket repository like test coverage, technical debt, code duplication, found code issues on Bitbucket's overview page.
  • Generate pull request comments for found code issues


Installing and Configuring Sonar for Bitbucket Cloud Plugin

Installing the Bitbucket plugin on Bitbucket is pretty straight forward. You need the Bitbucket cloud version for this. Login from which account (team/personal) you want to configure, visit https://marketplace.atlassian.com/plugins/ch.mibex.bitbucket.sonar/cloud/overview and press 'Get it now' button to install the free plugin.

Now, create a file sonar.json in the root of code trunk folder and set configuration values. To figure out the project key, you can refer to the SonarQube dashboard or the sonar settings file used for your sonar analysis.

{
    "sonarHost": "",
    "sonarProjectKey": ""
}


Installing and Configuring Bitbucket Plugin for SonarQube

Please follow the instructions at https://github.com/mibexsoftware/sonar-bitbucket-plugin carefully. Download the plugin from the release page, place it inside /extensions/plugins directory and restart the sonar server.

A seperate sonar settings file was created (I named it as sonar-project-bitbucket.properties) to include additional properties for this build. You can get an good overview of Bitbucket plugin sonar properties from their web page. It will set sonar analysis mode to 'issues', you wont be able to see the analysis results being published to sonar dashboard. Do not get confused looking at the sonar dashboard.

# .. same values on other settings as existing sonar-project.properties file
  
#bitbucket plugin
sonar.bitbucket.repoSlug=
sonar.bitbucket.accountName=
sonar.bitbucket.teamName=
sonar.bitbucket.apiKey=
sonar.bitbucket.oauthClientKey=
sonar.bitbucket.oauthClientSecret=
#sonar.bitbucket.branchName=${GIT_BRANCH} --> This property added as a command line argument in jenkins build
sonar.host.url=
sonar.analysis.mode=issues

In order to generate comments on pull requests from a branch, you need to analyse the code of the relevant branch. Hence it will be a good idea to go with a parameterized Jenkins build where you can input on which branch to checkout in Jenkins. Here, GIT branch name will be taken from a Jenkins build parameter (which will be available as an environment variable) since it does not work when included it inside sonar-properties file. It has to be provided as an seperate argument within Jenkins build itself.

There is a GIT Parameter Plugin for Jenkins through which the same can be done, but it did not work well for me.

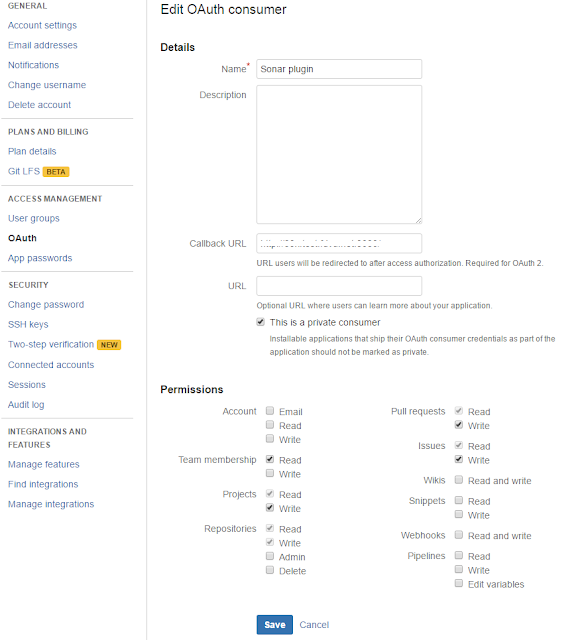
To generate an OauthClient key, go to settings of your Bitbucket account, go to OAuth from the left menu, and click on add oauth consumer button. A sample settings of an OAuth consumer is shown below. Make sure you fill the 'Call back URL' field; otherwise it will not work. I just put my Jenkins URL as the callback URL (It does not matter, you can use any URL; may be sonar server URL).


After creating OAuth consumer, click on it to get the oauthClientKey oauthClientSecret.


Jenkins Configuration

We have used SonarQube plugin for Jenkins. Since we had to configure a parameterized job, we considered GIT Parameter Plugin, but it did not work well for us. Hence a string parameterized build was configured as below.


In order to enable sonar-project-bitbucket.properties, following two commands to be executed as a windows command execution build setp, before triggering sonar analysis. I tried specifying sonar-project-bitbucket.properties file in 'Path to project properties' field of Sonar Scan task configuration, but it did not work for me. Hence I had to do this work around.

del sonar-project.properties
copy sonar-project-bitbucket.properties sonar-project.properties

Following is how sonar scanner build step configured. Sonar scanner installation has been configured via manage Jenkins.


How to Use 

Below is how use the setup to generate comments on Bitbucket pull requests.

  • After finishing up on work in a branch, create a pull request for branch to merge into the master.
  • Trigger parameterized Jenkins build specifying the branch name to build.
  • Comments of sonar violations will be appeared in the pull request itself!


Output

Generated comments in Bitbucket will look like as below.


Wednesday, August 3, 2016

Generating Sonar violation report email from Jenkins

In my current project, we manage stories in Jira and commit our code to a GIT repo at BitBucket. We have configured Jenkins for continuous integration pruposes. Recently we installed a SonarQube instance for static code analysis. Sonar helped us to identify issues in codebase a lot.

We had a Jira tasks workflow of To-do -> In progress -> Code review -> PO review -> Done. Once development is finished, we used to move stories to Code review state, where the code will be reviewed, and feature will be tested by a peer before making it to PO review status.Although we have configured sonar, it was not easy to directly identify the new violations being created by committed code.

We tried two approaches to make the developers lives easy by making the new violations visible. First approach was to generate an daily email report of new sonar violations created by each developer. The second approach was an integration of SonarQube and BitBucket, which I will describe in a separate post.

Having configured sonar server http://localhost:9000/ (lets say), following is how we made the daily email report of sonar vialoations.

The daily sonar violations email report will be generated to show new violations created based on the new code being added/ existing code modified by commits during the day. A jenkins job was used to trigger the analysis at 11.00 pm nightly. It is important to make sure that jenkins job completed before the mid night of the day since the report generation happens at the end of the jenkins job. If the report generation falls into the very beginning of following day, an empty report will result.

Sonar Configuration

SonarQube server version used was v5.4 with no password protection. Disabling authorized access which is the default configuration of sonar server, is important to access sonar api by the script template.

Jenkins Configuration

Jenkins version 1.6 was used to trigger a nightly sonar analysis. Below jenkins plugins were installed and configured on the jenkins instance.

  1. SonarQube plugin: an integration of SonarQube into Jenkins
  2. Email Extension plugin: a replacement to jenkin's default email publisher. Provides some advanced email features.
  3. Groovy plugin: enable executing goorvy code.

After installing plugins to to Manage Jenkins → Configure System, and do the following configurations.

  1. Under SonarQube servers section, input name of your choise, server URL of sonar server instance (e.g. http://localhost:9000) and select the correct server version (e.g. '5.3 or higher' in our case)
  2. Under Global Properties section, enable environment variables, and add name/value pair of 'SONAR_PROJECT_KEY'/ your sonar key of the analysis which you have configured in sonar analysis properties. (i.e. the value sonar.projectKey property in sonar arguments) You can easily find out sonar key from sonar project dashboard.
  3. Under Groovy section, add a groovy installation. Set GROOVY_HOME to the \bin location of the grrovy installation folder in your machine. (e.g. C:\groovy-2.4.6\bin)
  4. In SonarQube Scanner section, add an SonarQube scanner installation. Set a name and SONAR_RUNNER_HOME the path of sonar scanner installation on your machine. (e.g. C:/SonarQube/sonarqube-5.4/sonar-scanner-2.6)
  5. In Jenkins Location section, fill the URL of jenkins instance, and set an email address as the System Admin e-mail address.
  6. Set the SMTP email server settings under Email Notification section. You may even configure to use your gmail account here.
  7. Under Extended Email Notification, set your email at Default Recipients. You may set 'Default Subject' something like "$PROJECT_NAME - Build # $BUILD_NUMBER - $BUILD_STATUS!" A sample Default Content would be as follows.

$PROJECT_NAME - Build # $BUILD_NUMBER - $BUILD_STATUS:
Check console output at $BUILD_URL to view the results.
//jenkins

Then configure a Jenkins build job for the project. Add build setp 'Execute SonarQube Scanner' in jenkins job configuration page. Select correct SonarQube Scanner from the dropdown. You may keep other fields blank/default values there.

You may schedule the job before 12 mid-night as follows (between 11.00 pm to 11.15 pm in my example).


With the Email Extension Plugin of Jenkins, it is possible to generate HTML emails based on a Grrovy templates. When I was searching for a similar work, I found an interesting groovy template script found at https://gist.github.com/x-cray/2828324. The script was developed for an earlier version of SonarQube server. But, by SonarQube version 5.0 the API has been changed a lot. (Newest API documentation can be found at https://sonarqube.com/web_api/api/sources ) Hence I had to upgrade the script to work with sonar v5. The upgraded script can be found at https://gist.github.com/isurusndr/dd6dc9fd9768f57eb93e6cdad9af7cf3.

Configure another jenkins job and schedule it to run after 1-2 hours from the sonar analysis job configured above step. Just add steps to build the project, because we will be using the job just to send the email report. It is important to have another job to send the sonar report, because sonar takes some time to persist the data into its database after sonar analysis. Hence, if you try to send the email within the same job above, email will always report no violations.

Copy the latest script into a file and save it as groovy-sonar-report.template. Place it inside the email templates folder of jenkins installation. \email-templates. You can also test the email template in jenkins interface. Just input the email template name (e.g. groovy-sonar-report.template) and select a build to run against.


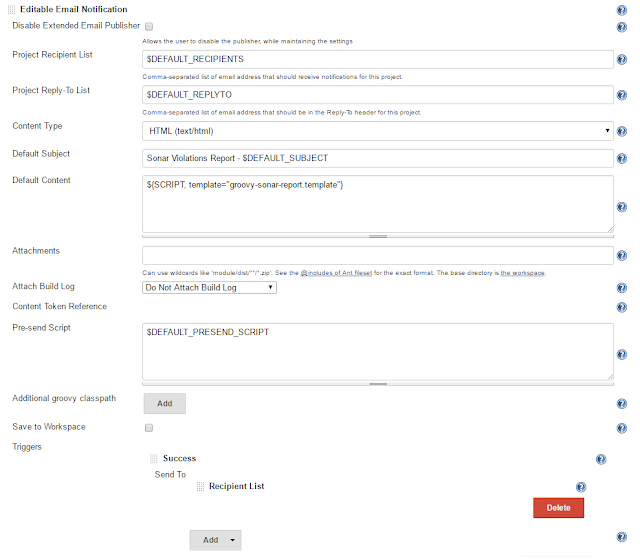
In your jenkins job configuration, dd post-build setp 'Editable Email Notification' and configure it as follows.


And the final email output was as follows :). Sorry I had to erase out few content lines from the screenshot. I had few styling issues when viewing it in Outlook 2013. Please see the comment of mine at https://gist.github.com/isurusndr/dd6dc9fd9768f57eb93e6cdad9af7cf3 to find out how I solved it.


Tuesday, April 26, 2016

Upgrading SonarQube From v4.5 to v5.4

Few days back I upgrade the SonarQube instance we used for one of our projects from version 4.5 to version 5.4. We run it on a dedicated server using MsSQL as the back end database. We also have a Jenkins scheduled job to trigger code analysis overnight.

The sonar upgrade instructions can be found at http://docs.sonarqube.org/display/SONAR/Upgrading was very helpful. Read it carefully before you start upgrading.

The most important task before you do the upgrade, is to back-up the database. Instead of creating a database back-up, I just duplicated the existing database.

I used the copy database wizard of Microsoft SQL Server Management Studio. The wizard is straight forward to use. In the screen to select the transfer method, I selected 'Use SQL Management Object Method' since my database was not so large. I tried 'Use the detach and attach method', but it gave some errors during database copy.

After database copy, I downloaded SonarQube 5.4 at http://www.sonarqube.org/downloads/ followed the upgrade instructions.

After updating sonar.properties in the SonarQube v5.4 installation, I tried starting the sonar and got the following error.
WrapperSimpleApp: Encountered an error running main: org.sonar.process.MessageException: Unsupported JDBC driver provider: jtds
org.sonar.process.MessageException: Unsupported JDBC driver provider: jtds

When I inspected the sonar.properties, I found the issue with the connectionstring. My original connectionstring looked like this:
sonar.jdbc.url=jdbc:jtds:sqlserver://localhost:1433/SonarQube;SelectMethod=Cursor

The new one should be (note the changes from previous connectionstring):
sonar.jdbc.url=jdbc:sqlserver://localhost;databaseName=SonarQube

After fixing the connection string, SonarQube started without issues. Then I upgraded the Sonar Runner (now called Sonar Scanner) installation on the Jenkins node with Sonar Scanner 2.6 which can be downloaded at http://docs.sonarqube.org/display/SCAN/Analyzing+with+SonarQube+Scanner. Changing the sonar-scanner.properties in the new Sonar Scanner from previous Sonar Runner installation was straight forward. Note that the connection string format remains the same from previous version (unlike in SonarQube sonar.properties).

As the final step, I upgraded the SonarQube Scanner for Jenkins plugin. The new jenkins plugin have some extra configurations to be made than the previous plugin. Have a look at http://docs.sonarqube.org/display/SCAN/Analyzing+with+SonarQube+Scanner+for+Jenkins

I found SonarQube v5.4 dashboard looks exciting than the previous version. Furthermore there is one big enhancement in this new version which has impact on the integration with Visual Studio Online: no direct database access is necessary anymore.

Friday, February 12, 2016

TargetException While Trying to Invoke Method of a Delegate on VS 2015 but not on VS 2013

We met with an interesting issue in my current project few days back. A code segment of the latest release was failing on the server. When it tested, it was running correctly without any issue on my local machine. I export the same, with release build configuration and deployed in a test server, it was running without issues. To get confirmed on the production server configurations, we deployed the problematic latest release build artifact in the test server, it was still failing there.

After a day of troubleshooting,  I figured out the VS 2015 was used in building the release build which was deployed on the production server, while I was using VS 2013 locally. When checked, the same code was failing when its ran locally in VS 2015. So, the same code runs without issues in VS 2013 and fails in VS 2015. Isnt it interesting?

The line of code causing the issue, was to invoke a lambda expression dynamically using reflection. In production server, a TargetException was thrown; which seems not possible to happen.

System.Reflection.TargetException: Object does not match target type.
   at System.Reflection.RuntimeMethodInfo.CheckConsistency(Object target)
   at System.Reflection.RuntimeMethodInfo.InvokeArgumentsCheck(Object obj, BindingFlags invokeAttr, Binder binder, Object[] parameters, CultureInfo culture)
   at System.Reflection.RuntimeMethodInfo.Invoke(Object obj, BindingFlags invokeAttr, Binder binder, Object[] parameters, CultureInfo culture)
   at System.Reflection.MethodBase.Invoke(Object obj, Object[] parameters)

My code was something like below (code was more complex than this, below is just a easy to understand sample of it).

public interface IValueMapper
{
Func GetMappingFunction();
}

public class SameValueMapper : IValueMapper
{
public SameValueMapper() { }

public Func GetMappingFunction()
{
return x => x;
}
}

..........

var MyMapper = new SameValueMapper();

var genericMethodInfo = MyMapper.GetType().GetMethod("GetMappingFunction").MakeGenericMethod(typeof(int));
var convertFunc = (MulticastDelegate) genericMethodInfo.Invoke(MyMapper, new object[] { });
var val = convertFunc.Method.Invoke(convertFunc, new object[] { 10 }).ToString();

Apparently in VS 2015, there is change in the way lambda expressions are converted to delegates, before Roslyn the generated methods were static but with Roslyn this is no longer the case, instance methods are generated now. hence we need to use Delegate.DynamicInvoke instead of attempting to invoke the delegate's target method directly.

What's new and what has changed in VS 2015 can be read at here.

So the solution was so simple as just modifying the last row as below. It worked both in VS 2013 and VS 2015.

var val = convertFunc.DynamicInvoke(new object[] { 10 }).ToString();

I found this solution from MSDN Forums though. Read this stackoverflow thread to understand the difference between Invoke and DynamicInvoke.


Tuesday, February 2, 2016

Transforming DocBook XML contents into HTML and PDF in C# (Part 2)

This is a continuation from my previous article on transforming DocBook XML contents into HTML and PDF. In this article, I will compare some of FOP implementation options in C#.

.NET framework itself does not have its own implementation for handing FOP processing. Though there are few commercial fop libraries are there having the capability of doing fop to pdf conversion, it seems to be too expensive. No open source native .net fop implementations were found. From Java side, Apache is actively maintaining a open source project called Apache FOP which is easy to use, and has good performance. Following options are there in integration apache fop to generate PDF.

FO.NET [link]
NFop [link]
Apache FOP using IKVM
Calling Apache FOP command promt comands

Using FO.NET

FO.NET consists of 100% C# managed code. It is not just .NET integration, but a full port of FOP to the .NET environment. FO.NET is a port of Apache FOP to .NET based on version 0.20.4 of FOP and does not follow FOP's subsequent progress. How well FO.NET handles large amounts of data depends on the complexity of the XSL-FO. For reasonably complex XSL-FO developers said that they have seen processing times of about 1 second per page.

This is an open source project, but it seems its no longer actively maintained.

To use fo.net, download fo,net binaries, and place them in a folder. For manual conversion you may use the command line tool. A sample comand would be as follows. If it fails to create output pdf file, you may create a emty pdf file on the filesystem first, and give the location of it as the output pdf file location. The tool will overwrite the file with generated pdf content.

fonet -fo <path to fo xml file>  <path to output pdf file>

To generate three pages pdf from a sample fo file which is generated previously, fo.net command line took around 10000 ms.
In order to use fo.net in your managed code, you must add fonet.dll which comes with the command line tool, as a rference to your project. A simple implementation of pdf generation using the filesystem is shown below.

private void GeneratePdf()
{
    FonetDriver driver = FonetDriver.Make();
    driver.CloseOnExit = true;
    driver.OnInfo += new Fonet.FonetDriver.FonetEventHandler(OnInfo);
    driver.OnWarning += new Fonet.FonetDriver.FonetEventHandler(OnWarning);
    driver.OnError += new Fonet.FonetDriver.FonetEventHandler(OnWarning);
    driver.Render(@"<path to fo file>", @"<path to pdf output file>");
}
  
private static void OnInfo(object driver, FonetEventArgs e)
{
    Console.WriteLine(e.GetMessage());
}

private static void OnWarning(object driver, FonetEventArgs e)
{
    Console.WriteLine(e.GetMessage());
}

Reference: Creating PDF documents from XML [link]
It seems that the performance from the library can be an issue when processing a large amount of data into pdf.

Using NFop

NFop is a Formatting Objects Processor (FOP) for XSL-FO that runs on the .NET Framework. It is a port from the Apache XML Project's FOP Java source to .NET's Visual J#. This makes it great for pure .NET reporting modules.
To use NFop in your project, you need to add nfop.dll which comes with this release; and vjslib.dll from Visual J# Distribution which can be downloaded from here.

Reference: Generating PDF reports using nfop [link]

NFop seems to have a same performace than FO.NET at least in the command line tool. NFop also is an open source projct not actively maintained now. It is older than FOP.NET.

Using Apache FOP

Apache FOP standalone command line tool has a better performance than both FOP.NET and NFop tools. In addition, apache project is actively maintained.

Integrating Apache fop with IKVM
http://balajidl.blogspot.com/2006/01/net-calling-apache-fop.html

Calling Apache fop as a command line app
http://stackoverflow.com/questions/20518905/opening-apache-fop-command-line-from-c-net-application

Sample Implementation Using FO.net

XmlReaderSettings settings = new XmlReaderSettings();
settings.DtdProcessing = DtdProcessing.Parse;
XDocument newTree = new XDocument();
using (XmlWriter writer = newTree.CreateWriter())
{
    // Load the style sheet.
    XslCompiledTransform xslt2 = new XslCompiledTransform();
    var xmlresolver = new MyXMLResolver(); 
    //DocBookFoXsl is the class of compiled styelsshets
    xslt.Load(typeof(DocBookFoXsl));
    // Execute the transform and output the results to a writer. If xml file is generated via xml serialization, provide that xml document to below
    xslt.Transform(XmlReader.Create(Server.MapPath("<path to given sample xml>"), settings), writer);
}
using (Stream fileStream = System.IO.File.Create(@"<path to output pdf>"))
{
    FonetDriver driver = FonetDriver.Make();
    driver.CloseOnExit = true;
    driver.OnInfo += new Fonet.FonetDriver.FonetEventHandler(OnInfo);
    driver.OnWarning += new Fonet.FonetDriver.FonetEventHandler(OnWarning);
    driver.OnError += new Fonet.FonetDriver.FonetEventHandler(OnWarning);
    driver.Render(newTree2.CreateReader(), fileStream);
}

This implementation took 9 - 30 seconds to convert the same sample xml file I used do to the evaluation.

Sample Implementation Using Apache FOP as a Command Line Tool

Following is the sample code to use apache fop comand line tool by invoking it as a process.

XmlReaderSettings settings = new XmlReaderSettings();
settings.DtdProcessing = DtdProcessing.Parse;
XDocument newTree = new XDocument();
using (XmlWriter writer = newTree.CreateWriter())
{
    // Load the style sheet.
    XslCompiledTransform xslt = new XslCompiledTransform();
    var xmlresolver = new MyXMLResolver();
    //DocBookFoXsl is the class of compiled styelsshets
    xslt.Load(typeof(DocBookFoXsl));
    // Execute the transform and output the results to a writer. If xml file is generated via xml serialization, provide that xml document to below
    xslt.Transform(XmlReader.Create(Server.MapPath("<path to given sample xml>"), settings), writer);
}


newTree.Save(@"<path to save generated xml fo as a temp file>");
var process = new Process();
string output;
try
{
    process.StartInfo.FileName = @"<path to apache fop installation folder>\fop.cmd";
    process.StartInfo.Arguments = @"-fo <path to temp saved xml fo file> -pdf <path to temp output pdf file>";
    process.StartInfo.UseShellExecute = false;
    process.StartInfo.RedirectStandardOutput = true;
    process.Start();
    // Synchronously read the standard output of the spawned process.
    StreamReader reader = process.StandardOutput;
    output = reader.ReadToEnd();
    // Write the redirected output to this application's window. In production code, use logger instead
    Console.WriteLine(output);
    process.WaitForExit();
}
catch (Exception e)
{
    //Handle exceptions
}
finally
{
    process.Close();
}

The above implementation took 3-7 seconds to convert the sample xml file to pdf.

As a conclusion, implemantation using apache fo as a command line tool to process fo xml is faster and stable than the other options. I have of course did not consider .net commercial fop libraries here.