This integration generated comments indicating sonar violations on file changes within a pull request. It will enable the visibility of violations being introduced from code within a GIT feature branch, at the time of pull request to merge the branch with the master. It will further make the life of peer reviewer a lot easy.
A free add-on to Bit Bucket called 'Sonar for Bitbucket Cloud' together with Bitbucket plugin for SonarQube were used for the integration. The integration would do followings.
- Shows all relevant SonarQube statistics for a Bitbucket repository like test coverage, technical debt, code duplication, found code issues on Bitbucket's overview page.
- Generate pull request comments for found code issues
Installing and Configuring Sonar for Bitbucket Cloud Plugin
Installing the Bitbucket plugin on Bitbucket is pretty straight forward. You need the Bitbucket cloud version for this. Login from which account (team/personal) you want to configure, visit https://marketplace.atlassian.com/plugins/ch.mibex.bitbucket.sonar/cloud/overview and press 'Get it now' button to install the free plugin.Now, create a file sonar.json in the root of code trunk folder and set configuration values. To figure out the project key, you can refer to the SonarQube dashboard or the sonar settings file used for your sonar analysis.
{
"sonarHost": "
"sonarProjectKey": "
}
Installing and Configuring Bitbucket Plugin for SonarQube
Please follow the instructions at https://github.com/mibexsoftware/sonar-bitbucket-plugin carefully. Download the plugin from the release page, place it insideA seperate sonar settings file was created (I named it as sonar-project-bitbucket.properties) to include additional properties for this build. You can get an good overview of Bitbucket plugin sonar properties from their web page. It will set sonar analysis mode to 'issues', you wont be able to see the analysis results being published to sonar dashboard. Do not get confused looking at the sonar dashboard.
# .. same values on other settings as existing sonar-project.properties file
#bitbucket plugin
sonar.bitbucket.repoSlug=
sonar.bitbucket.accountName=
sonar.bitbucket.teamName=
sonar.bitbucket.apiKey=
sonar.bitbucket.oauthClientKey=
sonar.bitbucket.oauthClientSecret=
#sonar.bitbucket.branchName=${GIT_BRANCH} --> This property added as a command line argument in jenkins build
sonar.host.url=
sonar.analysis.mode=issues
In order to generate comments on pull requests from a branch, you need to analyse the code of the relevant branch. Hence it will be a good idea to go with a parameterized Jenkins build where you can input on which branch to checkout in Jenkins. Here, GIT branch name will be taken from a Jenkins build parameter (which will be available as an environment variable) since it does not work when included it inside sonar-properties file. It has to be provided as an seperate argument within Jenkins build itself.
There is a GIT Parameter Plugin for Jenkins through which the same can be done, but it did not work well for me.
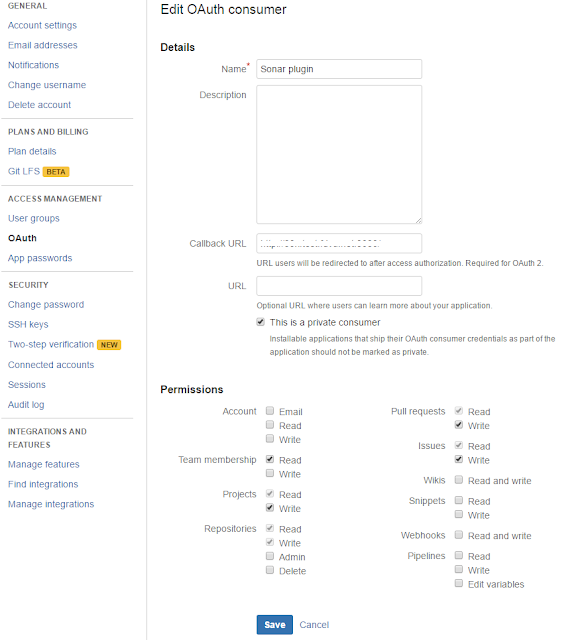
To generate an OauthClient key, go to settings of your Bitbucket account, go to OAuth from the left menu, and click on add oauth consumer button. A sample settings of an OAuth consumer is shown below. Make sure you fill the 'Call back URL' field; otherwise it will not work. I just put my Jenkins URL as the callback URL (It does not matter, you can use any URL; may be sonar server URL).

After creating OAuth consumer, click on it to get the oauthClientKey oauthClientSecret.

Jenkins Configuration
We have used SonarQube plugin for Jenkins. Since we had to configure a parameterized job, we considered GIT Parameter Plugin, but it did not work well for us. Hence a string parameterized build was configured as below.In order to enable sonar-project-bitbucket.properties, following two commands to be executed as a windows command execution build setp, before triggering sonar analysis. I tried specifying sonar-project-bitbucket.properties file in 'Path to project properties' field of Sonar Scan task configuration, but it did not work for me. Hence I had to do this work around.
del sonar-project.properties
copy sonar-project-bitbucket.properties sonar-project.properties
Following is how sonar scanner build step configured. Sonar scanner installation has been configured via manage Jenkins.
How to Use
Below is how use the setup to generate comments on Bitbucket pull requests.- After finishing up on work in a branch, create a pull request for branch to merge into the master.
- Trigger parameterized Jenkins build specifying the branch name to build.
- Comments of sonar violations will be appeared in the pull request itself!


2 comments:
Thanks a lot very much for the high quality and results-oriented help.
DevOps and Cloud Course Videos
Post a Comment