Wednesday, August 31, 2016

Cheap Chinese Mini LED Projectors

Few months back, when I was looking for a projector for a reasonable price for presenting things in meetings, I found mini LED projectors at ebay quite interesting. There are quite a lots of models available for purchase at various price ranges.

These projectors are called simplified micro projectors (SMP). It is one kind of projector which has simplified system structure design, but with multi-function. These projectors usually uses LCD as the image system and LED as light source.

The most important thing I have to tell you is that do not keep high expectation if you decide to buy a cheap projector. It comes with less/basic features for the less price you pay.

Usually these projectors can not be used in environments with bright light. Cheap SMPs can not produce a larger picture, but you can get a decent 34 to 130 inches image in a fairly dark environment. The picture isn't too bright, so you can get the best output in a dark room. Hence think of your requirement before buying one. It would suit well for home cinema. For doing a presentation in a fairly dark room, well it will yet do a reasonable job. But beyond that, you will have to go for an expensive projector.

UC40 and RD805 projectors


After doing few weeks of reading on internet, I finally ordered Unic UC40 model. My budget was around 80 USD, and UC40 was the best option to go as per some reviews. Alternatively GM 60 (another reference) and RD 805 seemed to be a good option too. Later I ordered RD805 for one of my friends. It was bit hard task to compare between models as there were not much reviews on internet on these projectors.

Most of SMPs produce 1000 lumens brightness and 1:1000 contrast ratio. They have 800x450 pixel resolution, well those specs are adequate for the price you paying.

I will bring a comparative review of UC40 and RD805 in my next post.

Friday, August 5, 2016

Integrating Bit Bucket with Sonar

In connection with my previous post on generating a sonar violations report by email, this post is about how I integrated BitBucket with Sonar.

This integration generated comments indicating sonar violations on file changes within a pull request.  It will enable the visibility of violations being introduced from code within a GIT feature branch, at the time of pull request to merge the branch with the master. It will further make the life of peer reviewer a lot easy.

A free add-on to Bit Bucket called 'Sonar for Bitbucket Cloud' together with Bitbucket plugin for SonarQube were used for the integration. The integration would do followings.

  • Shows all relevant SonarQube statistics for a Bitbucket repository like test coverage, technical debt, code duplication, found code issues on Bitbucket's overview page.
  • Generate pull request comments for found code issues


Installing and Configuring Sonar for Bitbucket Cloud Plugin

Installing the Bitbucket plugin on Bitbucket is pretty straight forward. You need the Bitbucket cloud version for this. Login from which account (team/personal) you want to configure, visit https://marketplace.atlassian.com/plugins/ch.mibex.bitbucket.sonar/cloud/overview and press 'Get it now' button to install the free plugin.

Now, create a file sonar.json in the root of code trunk folder and set configuration values. To figure out the project key, you can refer to the SonarQube dashboard or the sonar settings file used for your sonar analysis.

{
    "sonarHost": "",
    "sonarProjectKey": ""
}


Installing and Configuring Bitbucket Plugin for SonarQube

Please follow the instructions at https://github.com/mibexsoftware/sonar-bitbucket-plugin carefully. Download the plugin from the release page, place it inside /extensions/plugins directory and restart the sonar server.

A seperate sonar settings file was created (I named it as sonar-project-bitbucket.properties) to include additional properties for this build. You can get an good overview of Bitbucket plugin sonar properties from their web page. It will set sonar analysis mode to 'issues', you wont be able to see the analysis results being published to sonar dashboard. Do not get confused looking at the sonar dashboard.

# .. same values on other settings as existing sonar-project.properties file
  
#bitbucket plugin
sonar.bitbucket.repoSlug=
sonar.bitbucket.accountName=
sonar.bitbucket.teamName=
sonar.bitbucket.apiKey=
sonar.bitbucket.oauthClientKey=
sonar.bitbucket.oauthClientSecret=
#sonar.bitbucket.branchName=${GIT_BRANCH} --> This property added as a command line argument in jenkins build
sonar.host.url=
sonar.analysis.mode=issues

In order to generate comments on pull requests from a branch, you need to analyse the code of the relevant branch. Hence it will be a good idea to go with a parameterized Jenkins build where you can input on which branch to checkout in Jenkins. Here, GIT branch name will be taken from a Jenkins build parameter (which will be available as an environment variable) since it does not work when included it inside sonar-properties file. It has to be provided as an seperate argument within Jenkins build itself.

There is a GIT Parameter Plugin for Jenkins through which the same can be done, but it did not work well for me.

To generate an OauthClient key, go to settings of your Bitbucket account, go to OAuth from the left menu, and click on add oauth consumer button. A sample settings of an OAuth consumer is shown below. Make sure you fill the 'Call back URL' field; otherwise it will not work. I just put my Jenkins URL as the callback URL (It does not matter, you can use any URL; may be sonar server URL).


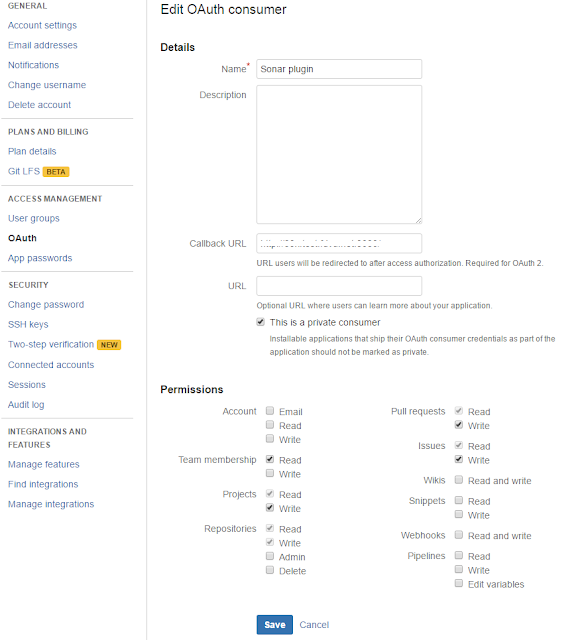
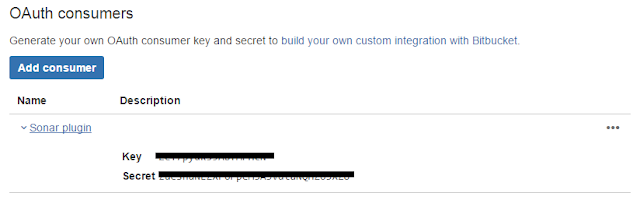
After creating OAuth consumer, click on it to get the oauthClientKey oauthClientSecret.


Jenkins Configuration

We have used SonarQube plugin for Jenkins. Since we had to configure a parameterized job, we considered GIT Parameter Plugin, but it did not work well for us. Hence a string parameterized build was configured as below.


In order to enable sonar-project-bitbucket.properties, following two commands to be executed as a windows command execution build setp, before triggering sonar analysis. I tried specifying sonar-project-bitbucket.properties file in 'Path to project properties' field of Sonar Scan task configuration, but it did not work for me. Hence I had to do this work around.

del sonar-project.properties
copy sonar-project-bitbucket.properties sonar-project.properties

Following is how sonar scanner build step configured. Sonar scanner installation has been configured via manage Jenkins.


How to Use 

Below is how use the setup to generate comments on Bitbucket pull requests.

  • After finishing up on work in a branch, create a pull request for branch to merge into the master.
  • Trigger parameterized Jenkins build specifying the branch name to build.
  • Comments of sonar violations will be appeared in the pull request itself!


Output

Generated comments in Bitbucket will look like as below.


Wednesday, August 3, 2016

Generating Sonar violation report email from Jenkins

In my current project, we manage stories in Jira and commit our code to a GIT repo at BitBucket. We have configured Jenkins for continuous integration pruposes. Recently we installed a SonarQube instance for static code analysis. Sonar helped us to identify issues in codebase a lot.

We had a Jira tasks workflow of To-do -> In progress -> Code review -> PO review -> Done. Once development is finished, we used to move stories to Code review state, where the code will be reviewed, and feature will be tested by a peer before making it to PO review status.Although we have configured sonar, it was not easy to directly identify the new violations being created by committed code.

We tried two approaches to make the developers lives easy by making the new violations visible. First approach was to generate an daily email report of new sonar violations created by each developer. The second approach was an integration of SonarQube and BitBucket, which I will describe in a separate post.

Having configured sonar server http://localhost:9000/ (lets say), following is how we made the daily email report of sonar vialoations.

The daily sonar violations email report will be generated to show new violations created based on the new code being added/ existing code modified by commits during the day. A jenkins job was used to trigger the analysis at 11.00 pm nightly. It is important to make sure that jenkins job completed before the mid night of the day since the report generation happens at the end of the jenkins job. If the report generation falls into the very beginning of following day, an empty report will result.

Sonar Configuration

SonarQube server version used was v5.4 with no password protection. Disabling authorized access which is the default configuration of sonar server, is important to access sonar api by the script template.

Jenkins Configuration

Jenkins version 1.6 was used to trigger a nightly sonar analysis. Below jenkins plugins were installed and configured on the jenkins instance.

  1. SonarQube plugin: an integration of SonarQube into Jenkins
  2. Email Extension plugin: a replacement to jenkin's default email publisher. Provides some advanced email features.
  3. Groovy plugin: enable executing goorvy code.

After installing plugins to to Manage Jenkins → Configure System, and do the following configurations.

  1. Under SonarQube servers section, input name of your choise, server URL of sonar server instance (e.g. http://localhost:9000) and select the correct server version (e.g. '5.3 or higher' in our case)
  2. Under Global Properties section, enable environment variables, and add name/value pair of 'SONAR_PROJECT_KEY'/ your sonar key of the analysis which you have configured in sonar analysis properties. (i.e. the value sonar.projectKey property in sonar arguments) You can easily find out sonar key from sonar project dashboard.
  3. Under Groovy section, add a groovy installation. Set GROOVY_HOME to the \bin location of the grrovy installation folder in your machine. (e.g. C:\groovy-2.4.6\bin)
  4. In SonarQube Scanner section, add an SonarQube scanner installation. Set a name and SONAR_RUNNER_HOME the path of sonar scanner installation on your machine. (e.g. C:/SonarQube/sonarqube-5.4/sonar-scanner-2.6)
  5. In Jenkins Location section, fill the URL of jenkins instance, and set an email address as the System Admin e-mail address.
  6. Set the SMTP email server settings under Email Notification section. You may even configure to use your gmail account here.
  7. Under Extended Email Notification, set your email at Default Recipients. You may set 'Default Subject' something like "$PROJECT_NAME - Build # $BUILD_NUMBER - $BUILD_STATUS!" A sample Default Content would be as follows.

$PROJECT_NAME - Build # $BUILD_NUMBER - $BUILD_STATUS:
Check console output at $BUILD_URL to view the results.
//jenkins

Then configure a Jenkins build job for the project. Add build setp 'Execute SonarQube Scanner' in jenkins job configuration page. Select correct SonarQube Scanner from the dropdown. You may keep other fields blank/default values there.

You may schedule the job before 12 mid-night as follows (between 11.00 pm to 11.15 pm in my example).


With the Email Extension Plugin of Jenkins, it is possible to generate HTML emails based on a Grrovy templates. When I was searching for a similar work, I found an interesting groovy template script found at https://gist.github.com/x-cray/2828324. The script was developed for an earlier version of SonarQube server. But, by SonarQube version 5.0 the API has been changed a lot. (Newest API documentation can be found at https://sonarqube.com/web_api/api/sources ) Hence I had to upgrade the script to work with sonar v5. The upgraded script can be found at https://gist.github.com/isurusndr/dd6dc9fd9768f57eb93e6cdad9af7cf3.

Configure another jenkins job and schedule it to run after 1-2 hours from the sonar analysis job configured above step. Just add steps to build the project, because we will be using the job just to send the email report. It is important to have another job to send the sonar report, because sonar takes some time to persist the data into its database after sonar analysis. Hence, if you try to send the email within the same job above, email will always report no violations.

Copy the latest script into a file and save it as groovy-sonar-report.template. Place it inside the email templates folder of jenkins installation. \email-templates. You can also test the email template in jenkins interface. Just input the email template name (e.g. groovy-sonar-report.template) and select a build to run against.


In your jenkins job configuration, dd post-build setp 'Editable Email Notification' and configure it as follows.


And the final email output was as follows :). Sorry I had to erase out few content lines from the screenshot. I had few styling issues when viewing it in Outlook 2013. Please see the comment of mine at https://gist.github.com/isurusndr/dd6dc9fd9768f57eb93e6cdad9af7cf3 to find out how I solved it.